Learn about the following topics:
Using SKUs vs Departments
Using Partial Case Quantities
Uploading with the SKU Mapper
With the WGits QB Software, you’ll be able to map your eCommerce platform SKUs to match the item names of your QuickBooks Company File. Most wineries don’t have their SKUs and QuickBooks item names matching identically which is why we created the SKU/Department Mapper.
An added functionality to this feature is the capability to map your eCommerce platform Departments to the item names of your QuickBooks Company File.

Depending on your platform, a Department could be named different things. For example, while some DTC Platforms use the term Departments, others may use the term Sales Report Category.
Some eCommerce platforms do not have a corresponding reference to Departments so depending on your platform you will want to keep the Selection to “Use the item SKU from the data source”. (shown above)
Uploading SKUs to the SKU Value Mapper
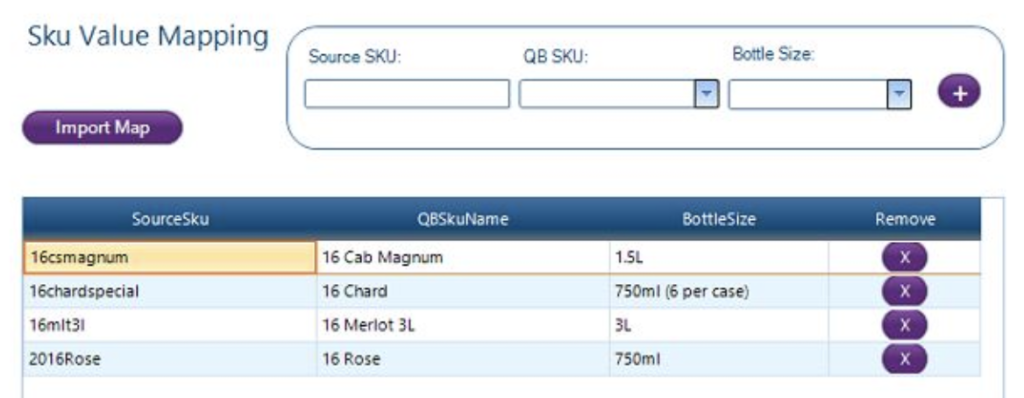
In WGits QB, navigate to Setup > SKU Map. You can either add SKUs one at a time or use the “Import Map” button to upload a CSV.
To add SKUs one at a time, type in a SKU in the Source SKU field, then type in or search through the dropdown for a corresponding QuickBooks item name (QB SKU). Lastly, you’ll see a Bottle Size field which is optional and can be left blank. Once the three fields are written in to your satisfaction, press the plus symbol button.
Partial Case Quantities
Some wineries use distributors or wholesalers and typically this means that the quantities in QuickBooks are based on case amounts where 1 quantity = 1 case rather than 1 quantity = 1 bottle. Not only that but cases are different for each bottle size. 12 750ml bottles = 1 case, where 6 1.5L bottles = 1 case. So selling just 1 bottle means it needs to be recognized as a partial case. If this applies to your winery, then WGits for QB is a wonderful automated solution to make your QuickBooks records much easier to manage.
Bottle Sizes currently available:
375ml = 24 to a case
500ml = split as partial quantities for 9L cases
750ml = 12 to a case
750ml (6 per case) = 6 to a case
1.5L = 6 to a case
3L = 3 to a case
Note: If 12 people buy one 750ml bottle, this does not perfectly equal 1 case. We have made WGits for QB smart enough that if someone buys 12 bottles in a case, that it does equal 1 full case properly. The quick explanation is QuickBooks is unable to make this work perfectly so an inventory adjustment at the end of each month is recommended to reconcile your inventory.
If you want to get into the nitty-gritty numbers of it all, here is a more in-depth explanation as to why this isn’t possible. To get fractions to equate properly in various partial case increments you usually need to round to the 9th decimal point (ie. one 750ml bottle within a case of 12 = 0.083333333), however, QuickBooks can only do 5 decimal points (ie. 0.08333). This will make the case quantity slightly off over the course of time as more individual bottles sell of various bottle sizes because QuickBooks cannot round the way we need. So a manual adjustment to accommodate this small offset is required to ensure that your inventory is accounted for.
Definitions:
Source SKU: Your eCommerce Platform SKU
QB SKU: Your QuickBooks Item Name
Bottle Size: Optional. If you need to use partial case quantities in QuickBooks use this third field. Choose from the dropdown of available bottle sizes for wines. Leave blank for merchandise items and leave blank if you do not require partial quantities to be filled.

Uploading your SKUs to the SKU Map is relatively simple. We’ve made the CSV file just three columns and no headers are required in the first row. The first column should just be your eCommerce Platform SKUs while the second column should be the corresponding QuickBooks item names. The third column will represent your bottle size.
Here’s an example:

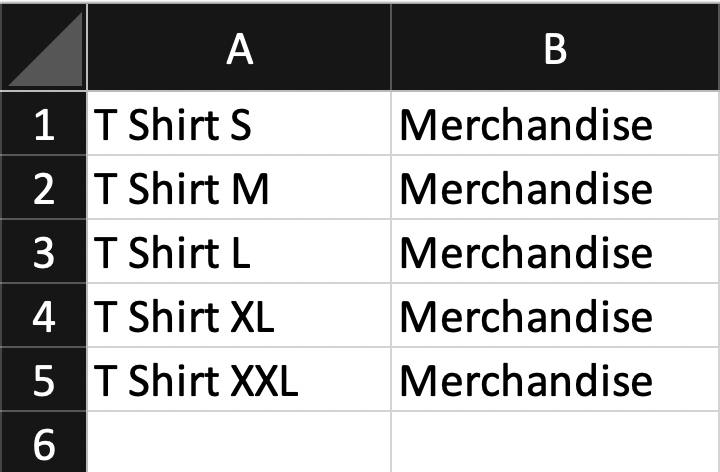
And another example for merchandise (just use two columns and leave the third blank):

The added benefit of this is when dealing with QuickBooks merchandise items. While your eCommerce platform might need to have every T-Shirt size be a different SKU, you can map all of those SKUs to the same QuickBooks merchandise item name.
When you save the file be sure to save it as a CSV, otherwise it will fail to import successfully.
What about uploading Departments instead? See the information below.
Uploading Departments to the SKU Value Mapper
Depending on your eCommerce platform you use, that will determine which Department format to use with the SKU Mapper. WGits Support is happy to assist you with obtaining these pieces of information and it is included in your Support services as part of your monthly subscription. However, in case you wish to set this up yourself, below are some examples of how to set this up yourself on some supported Platforms:
Commerce7 Departments
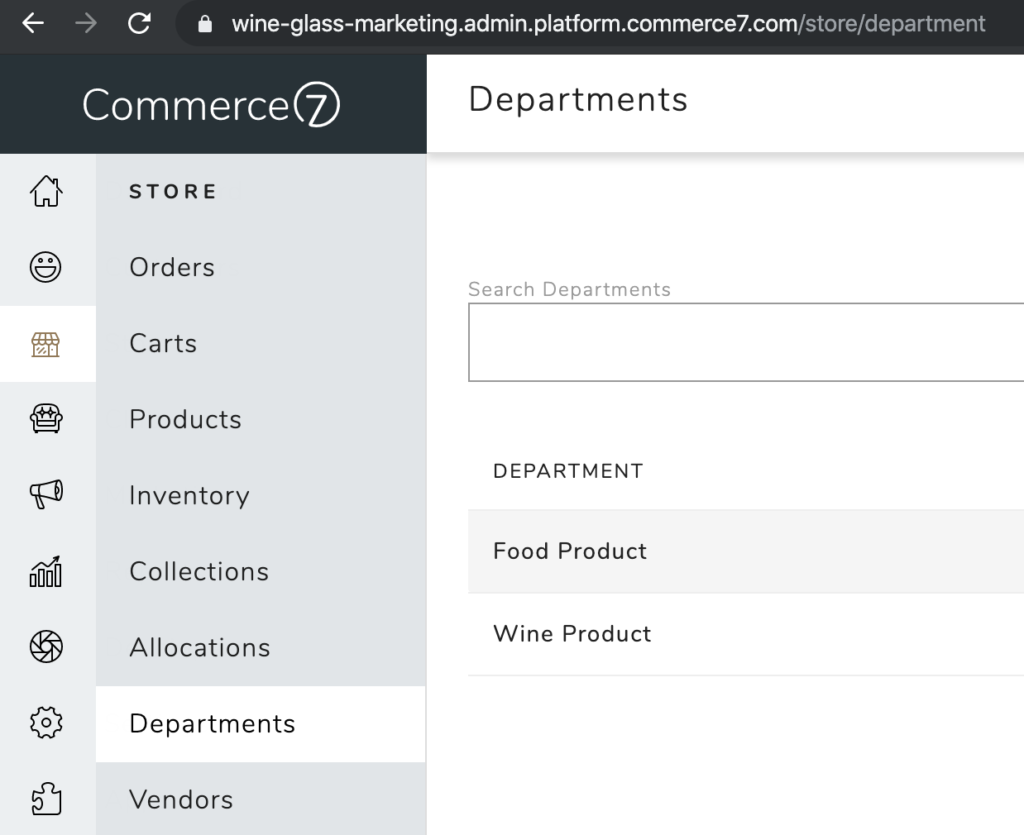
This one is kind of tricky. WGits Support is happy to assist you with obtaining these pieces of information and it is included in your Support services as part of your monthly subscription. However, in case you wish to set this up yourself. Navigate to Store > Departments > Click on the Department you wish to map.

Now look in the website URL to find the Department ID. In the below image you will see the full URL. The portion that represents the Department that we need is right after the deparment/ portion of the code. So in this example we would use: e5881b17-e4ff-4b63-aa76-e11039d75e73 and enter that into Column A of your excel document.

eCellar Departments
Another tricky one. In eCellar Departments are called Sales Report Categories. We need to use a Sales Report Category ID for the Department Mapping to work.
Go into eCellar > navigate to Products > open a product > right click on the Sales Report Category (ensure one is assigned) > Inspect Element > in the code there is a section that shows the ID (one or two digit code representing the Sales Report Category). It’s that integer that we need to use in the Department Mapper in Column A. As mentioned earlier, this is something we can do during a setup call or support call for you.
WineDirect Departments
Perhaps the simplest option. Navigate to Store > Products > Departments. These names are setup to be identical in your Department Mapping CSV document in Column A. No fancy footwork needed.
Importing the SKUs/Departments
Once you click “Import SKUs” this will update those eCommerce SKUs in WGits to point to QuickBooks as the appropriately mapped item names.
If there is a QuickBooks item name that you added to the CSV that is not currently existing in QuickBooks, you will get an error. Any other errors will be recorded in an error version of the file which will be accessible on your main drive on your computer. A pop up window will appear if any errors came from the file you attempted to import, telling you how to navigate to the newly generated CSV error file. Successful SKUs will be added to the mapper, while failed SKUs will remain in the error file. This error file will tell you what went wrong with each SKU row.
Department Mapping
At times you may wish to map all SKUs that belong to a specific Department, but only map that one Department over. This is possible with the Department Map feature. Learn more about it here.
If you have any questions or need assistance with SKU Mapping, please feel free to let us know.


